
Published 2026-10-12 · By MarkupGen Team
Create HTML5 Banners from Figma with MarkupGen: Design, Convert, and Edit in Studio Editor
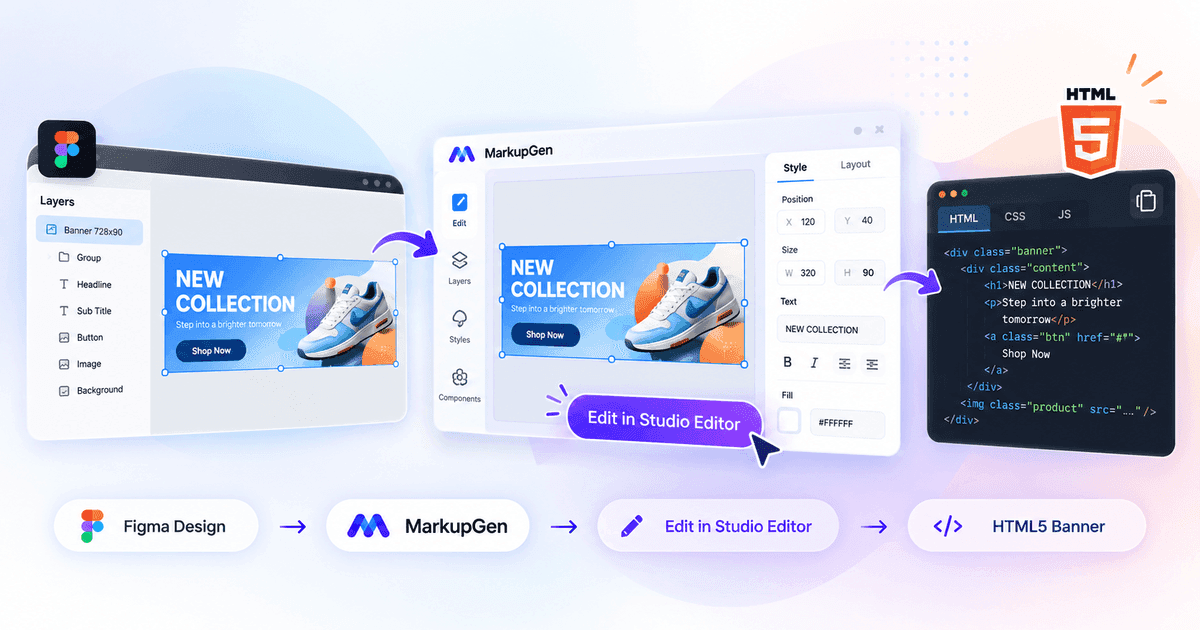
A banner looks finished in Figma long before it is finished in code. Someone still has to rebuild the headline, the product shot and the button in HTML and CSS — and then do it again when the copy changes, the button moves 8px, or the campaign needs three more sizes. Most of that time goes into small corrections, not into the first build.
MarkupGen shortens both halves of the job. It converts a Figma frame into HTML and CSS, and then lets you keep adjusting the result visually in the Studio Editor, without going back to Figma for every small change. This post walks through the full Figma to HTML5 banner workflow and is specific about what the tool does and does not do.
Figma design → MarkupGen plugin → HTML/CSS generation → Studio Editor → review → export
Convert Figma designs into HTML5 banners
The workflow starts in the MarkupGen Figma plugin. Select the banner frame and send it. The frame's structure, text and images arrive in your MarkupGen workspace as a project, where you generate the code.
A banner is converted the same way as any other frame, so the usual banner ingredients carry over:
- Headlines and promotional text stay as real text, not as part of a flattened image.
- Product images and background images are exported with the project.
- CTA buttons come through with their fill, radius and label.
- Shapes, layers, typography and spacing are read from the design file rather than estimated from a screenshot.
The result is a starting point that is usually close to the design, not a guarantee of a pixel-perfect copy. Unusual effects, custom fonts that are not on Google Fonts, and heavily overlapped layers are the places to check first. For a deeper look at how the conversion reads a design, see how MarkupGen's Figma-to-HTML/CSS conversion works.
Edit banners directly in the Studio Editor
This is the part that makes MarkupGen more than a code generator. Generated code is rarely the last version of a banner: the legal line gets longer, the CTA needs more breathing room, the client wants the logo larger. In most tools that means either editing CSS by hand or returning to Figma and converting again.
In MarkupGen you turn on Visual Editor in the project toolbar — the editing mode of the project studio — and work on the banner itself.
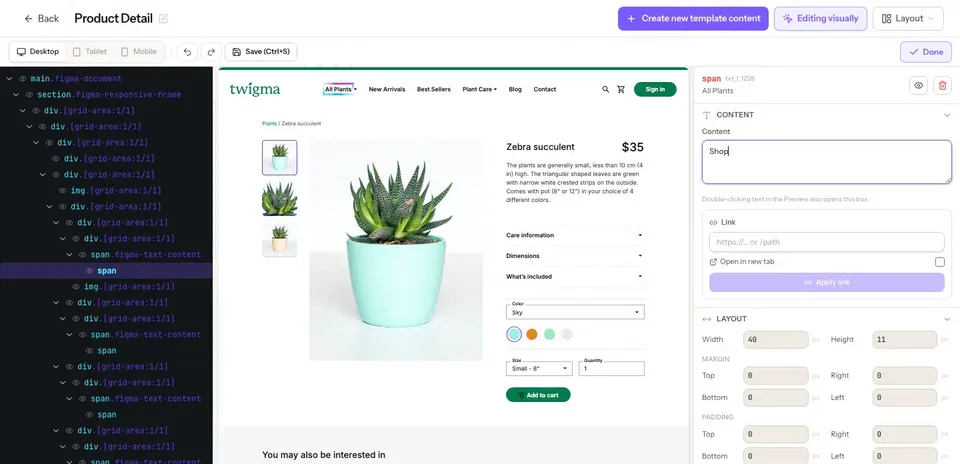
A real screenshot of the Visual Editor in MarkupGen, shown here with a product page design. Selecting an element opens its content, link and layout fields.
Select any element in the preview or in the HTML tree, and the inspector shows what you can change for it:
| What you want to fix | What the Studio Editor gives you |
|---|---|
| Copy and links | Edit text in place (double-click it in the preview), set a link and whether it opens in a new tab |
| Size and spacing | Width, height, margin and padding per side |
| Position and alignment | Align and justify within a flex or grid parent, change order, set a z-index, rotate |
| Typography | Font size, weight, line height and text alignment |
| Look | Background and text color, opacity, border, radius, shadow, and filters such as blur or brightness |
| Visibility | Hide, show or delete an element |
What that means in practice:
- Adjust layout and position of the supported elements without opening the stylesheet.
- Fine-tune size, spacing and alignment with exact values.
- Make visual changes without a round trip to Figma for every small edit.
- See the result immediately, undo or redo a step, and save when it looks right.
- Cut the back-and-forth between design and code. Each change is written back to the HTML and CSS, so the code you export is the banner you see.
Two honest limits. Editing is done by selecting an element and changing its properties in the inspector — it is not a free drag-and-drop canvas. And edits are one-way: they change the generated code, not your Figma file.
The Studio Editor is included in the Free plan, where it shares the monthly generation quota, and is unlimited on paid plans.
Multiple code generation options
For the Responsive HTML output you choose the CSS toolkit the code is written in:
- Vanilla CSS — plain CSS with no dependency, the simplest thing to drop into an ad slot or a CMS block.
- Tailwind CSS — utility classes, useful when the banner lives inside a Tailwind site.
- Bootstrap — for teams whose pages already load Bootstrap.
All three are available on the Free plan. Bulma, Materialize and Pico CSS are also supported and require a paid plan. If you are unsure which to pick, Vanilla CSS vs Bootstrap vs Tailwind compares them. For a standalone banner, Vanilla CSS usually gives the smallest and most portable file.
The Free plan includes 5 code generations a month; paid plans have daily quotas.
Preview, AI Evaluation and refinement
After generating, compare the preview with the original design image side by side in the workspace, and fix what you see in the Studio Editor.
On paid plans, AI Evaluation adds a second opinion. It compares the generated result with the original design and returns a 0 to 10 match score across six weighted criteria — layout and structure, spacing and alignment, typography, color, content and images, dimensions and effects — together with a written list of differences and an editable prompt you can use to regenerate.
Treat the score as a guide to where to look. It measures visual match to the design; it does not certify that a banner is pixel-perfect, production-ready or consistent in every browser. How to evaluate AI-generated HTML covers the checks worth doing by hand.
Export and use your HTML5 banner
When the banner looks right, save it and download the HTML together with its images and fonts as a .zip, or copy the code. On paid plans the same design can also be exported as React, Vue, Svelte or Angular components.
It helps to separate three things that are often all called "an HTML5 banner":
| What it is | In MarkupGen | |
|---|---|---|
| HTML/CSS banner | The banner layout as markup and styles | Yes — this is the core workflow |
| Animation and interactions | Motion, hover states, scripted behavior | Partly — entry animation presets (fade, slide, zoom, flip) that play when an element enters the viewport, with duration, delay and easing; there is no timeline or keyframe editor |
| Ad-platform package | A ZIP that meets one ad network's spec: click tracking, file-size limits, naming rules | No — you prepare and validate this yourself |
So the export is clean banner markup you own. If the banner is going to an ad network, add that platform's click-through code and packaging afterwards and run it through the platform's own validator. If it is going on your own site, a landing page or a CMS, the exported HTML and CSS are often all you need. For banners that go into an email instead, see Email Ready.
Who this workflow helps
- Frontend developers skip the rebuild and spend their time on the parts that need judgment. See MarkupGen for developers.
- Designers and creative teams can correct spacing and copy on the real banner instead of writing a change request.
- Digital marketing teams turn a campaign design into usable markup without waiting for a development slot. See MarkupGen for marketing teams.
- Agencies and advertising production teams handle rounds of client feedback as edits rather than rebuilds. See MarkupGen for agencies.
Workflow summary
- Design the banner in Figma, one frame per size.
- Transfer the frame with the MarkupGen Figma plugin.
- Generate HTML and CSS in the toolkit you need.
- Refine the banner in the Studio Editor.
- Review the preview against the design, and evaluate it with AI Evaluation if your plan includes it.
- Export the code and test it where the banner will run.
FAQ
Does MarkupGen export a ZIP that is ready for Google Ads or another ad network? No. MarkupGen exports the banner's HTML, CSS, images and fonts. Click tracking, file-size limits and the packaging rules of a specific ad platform are not handled, so you add and validate those yourself.
Can I animate the banner? You can apply entry animation presets such as fade, slide, zoom and flip, which play when an element enters the viewport, and set duration, delay and easing. There is no timeline or keyframe editor.
Is the Studio Editor available on the Free plan? Yes. Visual editing is included in the Free plan and shares its monthly generation quota. AI Evaluation requires a paid plan.
Do my edits sync back to Figma? No. Edits change the generated HTML and CSS only. Your Figma file is not modified.
Will the banner match my design exactly? It is usually close, but an exact match is not guaranteed. Compare the preview with the original and correct the differences in the Studio Editor.
Turn your Figma designs into editable HTML5 banners
Design in Figma. Generate code with MarkupGen. Refine your banner in the Studio Editor.